WhatsApp Integration with Salesforce
WhatsApp Integration with Salesforce
WhatsApp Integration with Salesforce
Salesforce did a partnership with Facebook specially for WhatsApp so that they can bring their customers to use WhatsApp for resolving their queries. We just need to configure how can we integrate cloud Api of WhatsApp and how we can configure the webhook and templates.
The new integration will enable brands to easily customize their experience to connect with their customers in a simple way to answer questions, promote and sell products. We just need to configure how can we integrate cloud api of WhatsApp and how we can configure the webhook and templates.
Introduction to Salesforce
Introduction to Salesforce
Salesforce is a cloud-based Customer Relationship Management (CRM) tool that is designed to support companies in managing their Sales and Customer related data. You can use the Salesforce CRM without any technical background as it is easy to set up and manage. It has defined the relationship between businesses and their customers by developing a more meaningful connection between them. By providing a single view for each of your client interactions, Salesforce CRM can give you unique insights into the customer’s journey and at the same time empower you with tools that can enhance your customers’ experience.
Introduction to WhatsApp
Introduction to WhatsApp
WhatsApp is ranked the world’s most popular Digital Engagement channel worldwide. WhatsApp provides an opportunity to engage with customers in a very reliable way with the benefit of end-to-end encryption. WhatsApp satisfies the current expectation of the customers with personalized custom answers in real-time.
WhatsApp is a very familiar messaging app that people already use across the globe and connecting to customers with it for business purposes actually simplifies your job. You can send text messages, images, PDFs using WhatsApp.
Steps of Integration
Steps of Integration
- Setup Facebook application
- Generate permanent access token
- Configure Webhook
- Send Text Messages
- Work with templates
- Create Custom Object in Salesforce to store the message
- Use Webhooks and work with chat
- Send WhatsApp message using Salesforce
1. Setting up Facebook account for salesforce + WhatsApp integration
1. Setting up Facebook account for salesforce + WhatsApp integration
As we know, WhatsApp is an internal product of Facebook. The first thing needed to be accomplished is to setup our Facebook Account.
- The first step is to click on Facebook. The next step is to click on Get Started tab which will allow you to setup your Facebook Account. You can use your existing Facebook account or you can create a new Facebook Account.
- Click on the Continue button. It will redirect you to next page where you will see the Email linked to your Facebook Account. All you need to do is accept the Terms & Conditions and click on Confirm Email button.
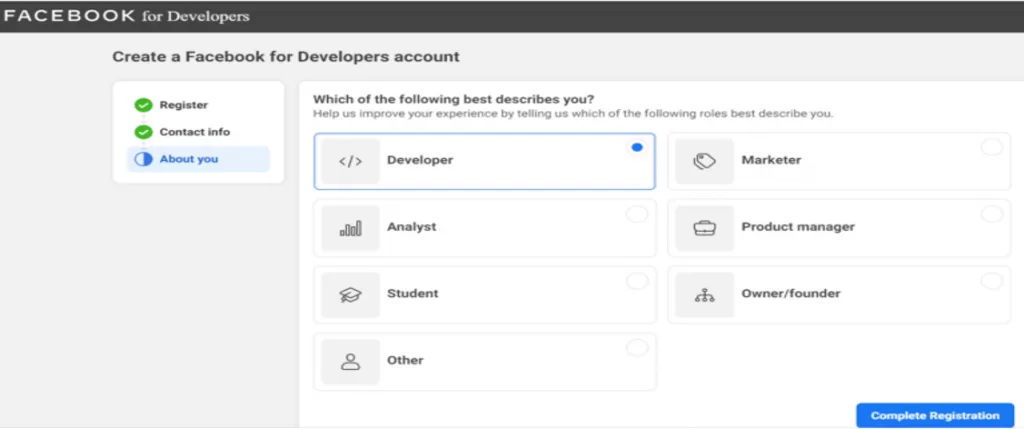
- The next step is to Select the role that describes you. For this series, we need to select Developer Role. Once you have selected Role, click on Complete Registration.
- If you have already logged in through your Facebook Account, you will directly be redirected to My Apps Page. Now we will be Creating WhatsApp App. After completing the previous steps, you will be redirected to the below page. Click on Create App button.
- Once you click on Create App, it will ask you to select an App Type. For this series, we need to select Business App. Click on the Business option and then click on Next button.
- Now, you have selected the Business App and so the next step is to provide unique name to your App. The next thing is App Contact Email which is used to contact you regarding policy violations.
- The next option to select Business Account is optional. Since we don’t want this App to be related to any Business Account, we will leave this option and proceed ahead by clicking on Create App button.For security reasons, it might prompt you to enter Password (your Facebook account password).
- Once the Password is entered, you will be redirected to application page which confirms that application has been created.
Add products to your app
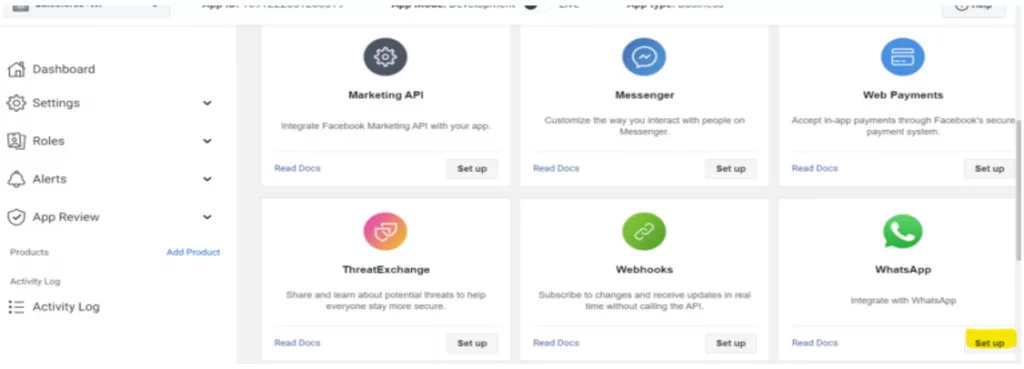
- In this step, we need to setup WhatsApp for our newly created application. For this you need to scroll down to the bottom of the page and look for WhatsApp. Then Click on Set up button on the WhatsApp.
- Once you click on Set up button, you will land to a new page where you will be asked to create or select a Meta Business Account, click by default selected option and then click on Continue.
- After this, you will be redirected to developer console of your WhatsApp where you will find your Temporary Access Token which you can use to make API calls. Below that you will see an option to Send and receive messages which consist of multiple steps that allows you to configure your WhatsApp for sending and receiving messages. Let’s understand the important steps under this option.
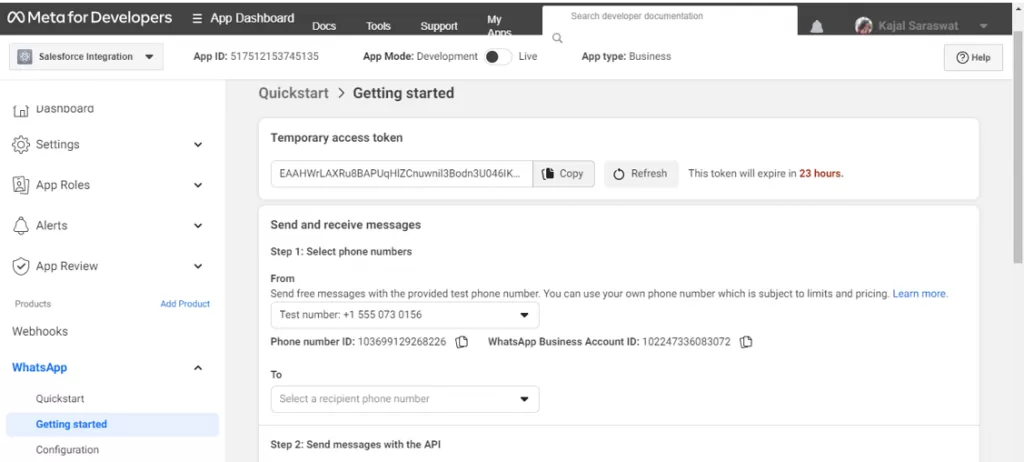
Select Phone numbers
This step allows you to configure your send & receive message phone number. From section allows you to send free messages from the Test number that has been provided by Facebook. Under To section, you will find that there isn’t any phone number available. For setting up this section, select the Manage Phone Number List option that appears in the dropdown. This allows you to add up to 5 phone numbers to receive free test messages. Select your country of residence and then enter the phone number to which you want to send the Test messages. After this, a verification code will be sent to the mentioned WhatsApp number. Enter the number as shown below to complete the verification.
Send Messages with the API
In this step, you will find the auto-generated command. All you need to do is, click on Send Message button to test your send message functionality. Once you click on Send Message button, a test message will be sent to the WhatsApp number mentioned in the To section. The message will appear as shown below.
2. Generate Permanent Access Token for WhatsApp
2. Generate Permanent Access Token for WhatsApp
- From the sidebar, click on the WhatsApp Section. Within this WhatsApp section, click on Getting Started option. Here, you will be able to find all the details that you have setup from the previous blog. In the Getting Started section, you will find the Temporary Access Token. The major drawback of this Temporary Access Token is that it will get expired within 23 hours. To avoid this task, it’s better to Generate Permanent Access Token.
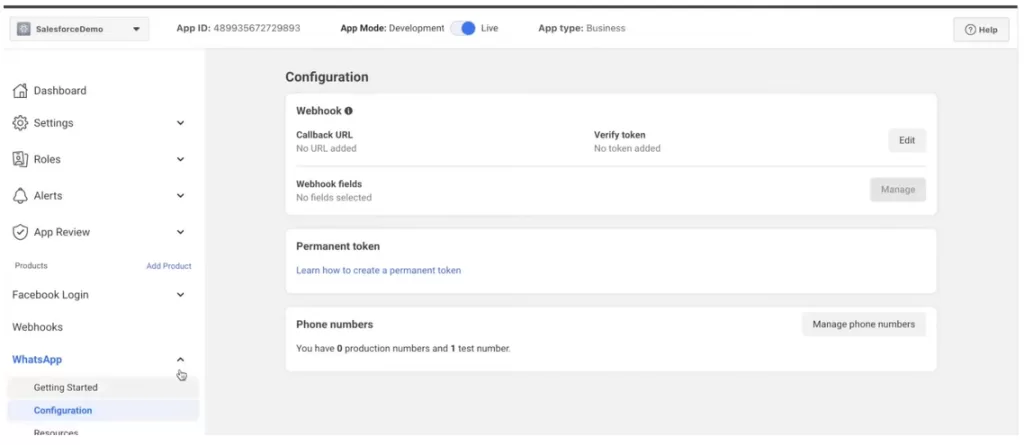
Initializing Permanent Access Token Generation
- To begin the process of Permanent Access Token generation, Click on Configuration option under WhatsApp section. In the Configuration section, you will see an option called Permanent Token. Click on Learn how to create permanent token link which will redirect you to documentation page of Facebook Developer.
- Scroll down to the Required Assets section on the documentation page of Facebook Developer. Please make sure that you have completed the steps mentioned in the Required Assets section. Now, the next step we need to perform is to generate an access token. For this, click on the first link under an access token section.
- This link will land you on to new page which will show all the points that are needed to Generate Permanent Access Token. Scroll down to Steps to add new system user section. Click on the first step Go to Business Settings.
Creating System User
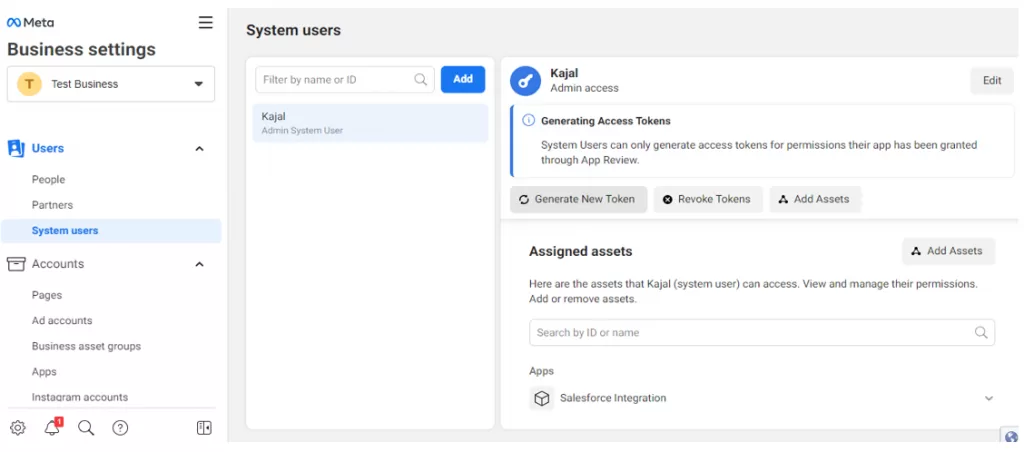
- Clicking on the above link will take you to the setting page of the Business Account that you have already created. From Sidebar, select System users under Users section. Click on Add button. A pop up will appear stating Non-discrimination policy. Leave all the options as it is and click on I accept button. After that another pop up will appear asking you to Create System User.
- You need to enter System Username and select Admin as System User Role. Once this step is completed, again pop up will appear stating Non-discrimination policy. Leave all the options as it is and click on I accept button. Now, you need to add this Admin user to the WhatsApp Account.
Adding newly created System User to the WhatsApp Account
- For this, scroll down to Accounts section from the sidebar. Here, you will find an option named WhatsApp Account. Click on WhatsApp Account option to add newly created System User.
- Click on Add People button. Now, it will show all the users that you have created. From the list, you need to select recently created System User. After that, assign Partial Access and Full Control to the selected user and click on Assign. This marks the completion of adding System User Process.
Adding newly created to your app
- Also, we need to add System User to the demo app that we have. To achieve this, scroll down to Accounts section from the sidebar. Here, you will find an option named Apps. Click on Apps option to add newly created System User. Click on Add People button. Now, it will show all the users that you have created. From the list, you need to select recently created System User. After that, assign Partial Access to develop the app and Full Control to the selected user and click on Assign. This marks the completion of adding System User Process.
Generating Permanent Access Token
- From the Sidebar, scroll up to Users section. Click on System Users option under Users section, select recently created System User and then click on Generate New Token.
- Once you click on Generate New Token, a pop up will appear asking you to select your Demo app. Select your demo app and assign two important permissions for this Demo App which is Whatsapp_business_messaging and Whatsapp_business_management.
- After this, click on Generate Token button which will appear at the bottom of this popup. After this, Permanent Access Token will get generated. For safer side, it will be better to copy and paste the Token on your Notepad as it won’t be stored at Facebook.
Using Postman to send messages to WhatsApp
- Go to developers.facebook.com then My Apps. Select the demo app that you have created Now, scroll down to WhatsApp section from sidebar. Select Getting Started option under WhatsApp section. In the Send and Receive Messages section, select your WhatsApp number in the To section. After this, come down to Send messages with the API section, copy the newly generated command and paste it on your notepad.
- Since, we are going to send messages to WhatsApp through Postman, it’s highly advised to download & install Postman. Once you have installed Postman, go ahead and open the Postman App and click on Import button (at the top left). Here you will find multiple tabs under the Import button. Select the raw text tab and paste the command URL that you have copied from the previous step. Once done, click on Continue button and then on Import button. So, this will generate a request for you.
- Now, the basic need of using Postman is to send message. So below this URL, you will find an option named Body. Go to that option, then click on Beautify. This will show you that message that will be sent. Next, click on Headers option. Under Headers, you will find two keys:
Authorization: – This contains the Temporary Access Token (which will expire within 23 hours). Here you need to replace it with Permanent Access Token. For that, remove everything from the Authorization and then type Bearer, give a space and paste the Permanent Access Token that you have saved in your Notepad.
Content – Type
Now, go ahead and click on Send Button next to the URL. This will send message to the mentioned WhatsApp number, and you can also see the confirmation message in the body section of the Postman as shown below.
3. Configure Webhook
3. Configure Webhook
Webhooks are most commonly used to simplify communication between two applications. Webhooks are automatic messages which are being sent whenever any event happens.
- Now for the configuration of webhook, click on getting started under the WhatsApp section and then click on configure webhooks.
- Now it will redirect you to the Callback URL and verify token page. This Callback URL we will develop using the experience cloud. Click on the hover over which will redirect you to the documentation which will help you to configure the webhook.
Callback URL is the public URL which we are going to develop using experience cloud. Callback URL will make an STTP callout. It expects some value in return from the system, i.e., Salesforce.
Verify token could be any random number which you want to put.
- Now we will create an Apex class which will be made as RestResouce so that our callback URL is available a s a web service. Now we will use the GET and POST requests.
- After that we need to create a community site. For that click on the gear icon and navigate to setup in salesforce. Now you need to search for all sites. If you have not enabled then first you need to enable the sites. To create a new site, click on NEW.
- After click on New, you will find multiple options we can select anyone. For now, let’s select Help Centre and then click on Get Started.
- You can write any name as you wish and click on Next. Now it will take some time to create your community and make it live. Now will be redirected to the workspace of our digital experience community which you just created.
- Now you see it is Active-Published and if you want to check it click on administration. After that you will be redirected to the below page. From there, you need to go to Pages and then click Go to force.com.
- Now, we will give the access to the public profile for our apex class. Now we will provide apex class access to our guest user. Click on the public access settings and then edit the enabled apex class access. Select the apex class for the access and then click on Save.
- Now to test this created community to check if our apex class has got the access or not. For that you have to get back to the administration page and then click on settings go head and copy your URL, open a new tab and paste that URL. If you see a blank page without any error it means our URL is working fine.
- Copy this URL and get back to the Facebook application. In the configuration section of this WhatsApp, click edit webhook’s callback URL then put your URL and use the token which you have mentioned in the apex class and then click on verify and save.
- It will send the request if your token is valid your things will get saved. We have configured the webhook. Now we need to see when we want to listen the webhook what are the events. For that click on webhook fields and then subscribe the fields as shown below.
4. Sending notification messages to the customers
4. Sending notification messages to the customers
- For this you need to move on to your application which you have created. Select the recipient on which number you want the messages to be shown and then click on run in postman, it will take you to the different window in the same browser. Now create any fork label and choose any workspace or you can also create the one and after that it will create a collection for you.
- After that it will take you to the workspace page. From there, under collections you will find WhatsApp cloud api.
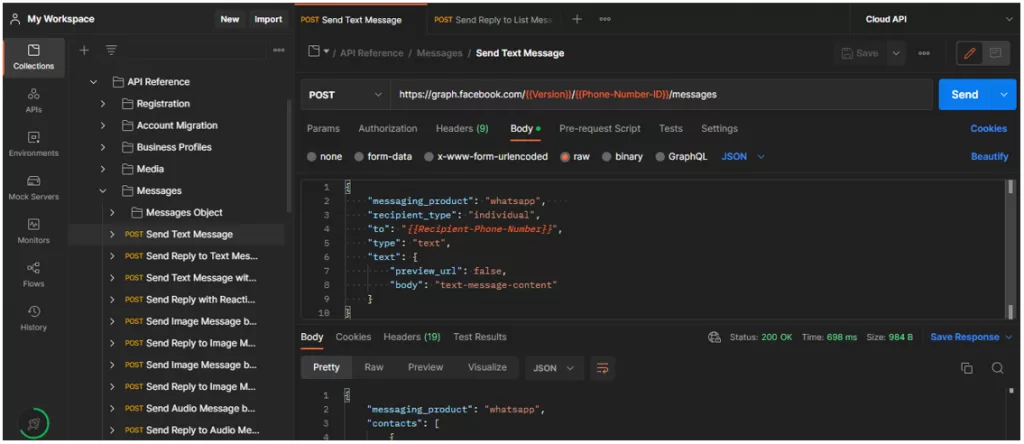
- Select the environment you will find cloud api there you will find all the variable which are already created for you. Move on to the collections and then select the environment cloud api so that all the variables are also accessible to the request. Now under the WhatsApp cloud api click on the send text message and click on send button. With this, a message will be sent to the provided phone number.
- Under API references and then messages you will find send text message from there you can send the message by customizing it.
5. Use WhatsApp Webhooks to Receive WhatsApp Messages in Salesforce
5. Use WhatsApp Webhooks to Receive WhatsApp Messages in Salesforce
- Till now, we have seen how to send the message to WhatsApp from postman using our Facebook api. Also, how to see the debug log or receive the notification when someone is trying to reply to our message.
Validating payloads – The URL we created is the publicly accessible URL how we can get to know that the request sent is authentic. For that we need our application secret. Copy the app secret as it will be used in the apex class while creating an HTTPPOST request.
- You can also store it in the custom label. Go to salesforce, navigate to settings and then custom label and store the app secret there.
- Now after create the apex class move on to the Debug logs from the quick find box and click new.
- In the traced entity name select Salesforce WhatsApp site guest user which you want and in the debug label select sfdc dev_console. Now whenever we reply from WhatsApp then every time we will find a new debug logs. This is how we are capturing whatever response is user is sending to us with the help of the webhooks. If you want to decode the message move on to json beautifier and paste the message there to get its detail.
6. Send WhatsApp Message Using Templates
6. Send WhatsApp Message Using Templates
- Whenever you as a business are trying to send the message to the customers you must have some approved templates. For that first go to docs and from there select WhatsApp business cloud api under guide you will find create template object.
Template object will tell us what are all the fields which will be required which creating a template. Template could also be of various types it could be simple, media, images, interactive messages. To create template get back to the detail page of your application. Under WhatsApp section click getting started. Click on the highlighted link to create a new template for your message.
- You will be redirected create template page to create the newone. Also, you can select the template according to your requirement.
- For now, let’s select marketing category and name it as sample_demo and language as English. From there you will be redirected to message templates. Now add header, body, footer and button whichever you want you will see its preview beside it.
- Now submit and your template will take sometime to get approved.
- Now let’s get back to the postman and then select send message template text from there customise the body according to your requirement and then you can send the message template which you want. You can see the response from the debug logs.
7. Store WhatsApp Message into Custom Object in Salesforce
7. Store WhatsApp Message into Custom Object in Salesforce
Here, we will create an object where we will store the messages because now, we are able to configure the webhook by using which we are able to listen the message and message is getting logged into the debug log. It will be helpful to implement lwc where we are going to implement chat details where the users will be able to chat with the users who are within the salesforce with the customers with the help of api.
- First let’s create a custom object by the name WA Message and create the required fields which we will need while we receive any message as shown below.
- Now when the customer will reply every time a new record will be created.
8. Send WhatsApp Message using Salesforce
8. Send WhatsApp Message using Salesforce
Here, we will see how we can send message using salesforce using WhatsApp cloud api. For that you first need to write an apex class. After that you need to add the URL to the remote site settings. Whenever we want to make a callout to third party system, we need to add the remote site settings under security of quick find box. Here we will be providing the basic URL along with the version number and the phone number id within it.
This is how you can send a message with the help of the salesforce using WhatsApp business cloud api and hence the integration is completed. Now, you can send and receive messages from WhatsApp to salesforce and vice-versa.


Leave A Comment