Salesforce With Zapier Integration
Salesforce With Zapier Integration
Salesforce With Zapier Integration
In today’s digital transformation era, large-scale enterprises are looking for an opportunity to automate their operational tasks to reshape their customer’s experiences to stay ahead of their competitors effectively. The Salesforce CRM platform provides everything that you would need to keep your customer relations healthy.
To access data from various sources into the Salesforce CRM platform, you require a secure integration of such resources with your Salesforce account. As you try to search about the same, you get Zapier as the prime solution.
What is Zapier?
What is Zapier?
Zapier is cloud integration partner that connects your software so that you can automate several tasks without any development effort or API requirement. Zapier is the mediator of data between the two platforms that you want data transaction to take place. Without writing a single piece of code, you can automate your functionality with Zapier.
Zapier integrates your accounts on cusjtomization. The workflow incorporates zaps, which are a single time workflow logic pieces that carry information. Both the systems you want to integrate can map data from one to another using these zaps.
You can get your tasks accomplished with just a few clicks and save enormous time spend on repetitive tasks. You can integrate your Salesforce account using Zapier with several different applications like:
- Google Sheet
- Google Calendar
- Zoom
- HubSpot
- MailChimp
- QuickBooks
- Google Calendar
- Slack
You just need to follow some essential steps to integrate any application with your Salesforce CRM account. As you use the Zapier platform, you save yourself from the lot of amounts of time and money lost behind integrating two or more third-party applications to your system.
Now, let’s start with Integration process of your Salesforce account using Zapier with several different applications.
Connect Zoom with Salesforce using Zapier
Connect Zoom with Salesforce using Zapier
Zoom is a Cloud-based application that allows you to set up virtual video and audio conferencing, webinars, screen sharing, and various other features that can enhance your video communication.
Following are the Steps required to integrating Zoom with Salesforce.
Step 1: Create Zoom Account
Create Zoom account using your email id or sign in with Google account.
Step 2: Create Zapier Account
Create your Zapier account or sign up with your Google account. Go to https://zapier.com and log in to your account or create a new one.
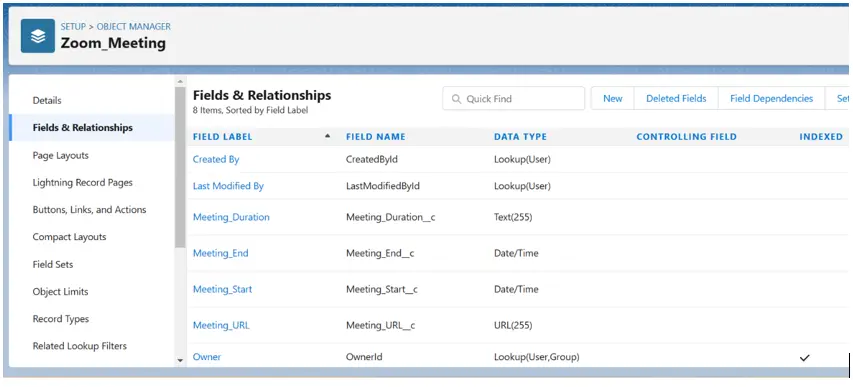
Step 3: Create custom object and custom fields in Salesforce
In your Salesforce org create custom object and some custom fields to store the zoom data as shown below:
Step 4: Make a Zap
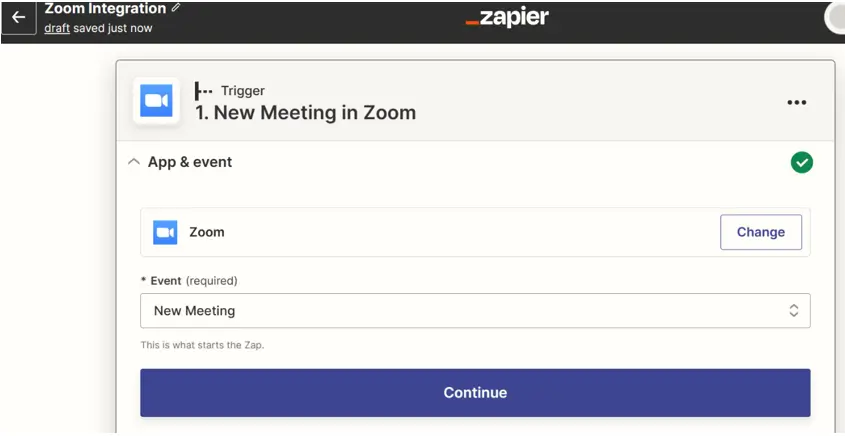
Now you can connect Zoom application with Salesforce by simply clicking on the dashboard option an selecting the respective apps. On dashboard click on create Zap button. On the top left corner, you can edit your zap name. Select the Zoom application and select the action New Meeting in Event option as we are running our trigger when a new meeting is getting scheduled as shown below.
Step 5: Select Zoom Account
Select your Zoom account in choose account section and select demo meeting from meeting type option. Then click Continue and Click on Test trigger. It will test dummy data from Zoom app in Zapier
Step 6: Select target application
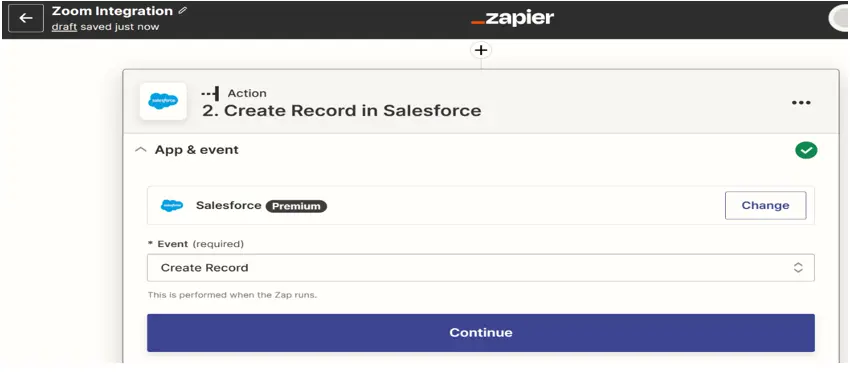
Select Salesforce as your target application and choose Create record option in event section as to save Zoom data by creating a new record in our salesforce org.
Step 7: Select Salesforce Account
Choose your Salesforce Account. Click the Sign-in button to link your salesforce account in the app to Zapier for the first time. If you have previously connected the app to Zapier, you can select from the dropdown menu of apps.
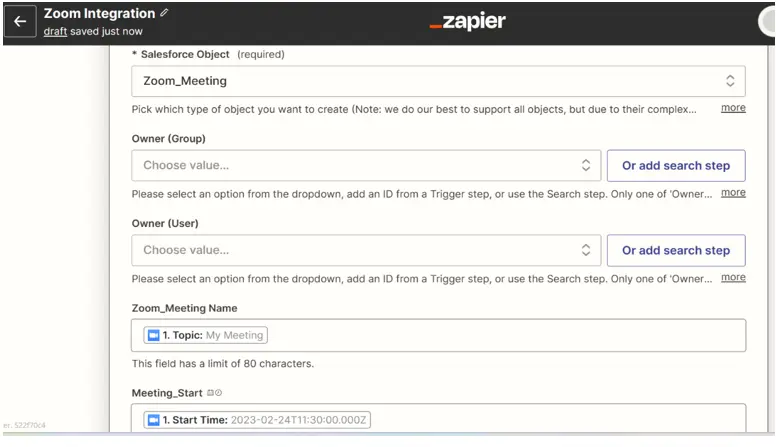
Step 8: Select Salesforce object and Map the Fields
Select your object and map the fields as shown below.
Step 9: Test the data
Verify the data and click on Test action button to test if your action is working or not and Click on Publish Zap to create the Zap. It will create a new record in your salesforce org.
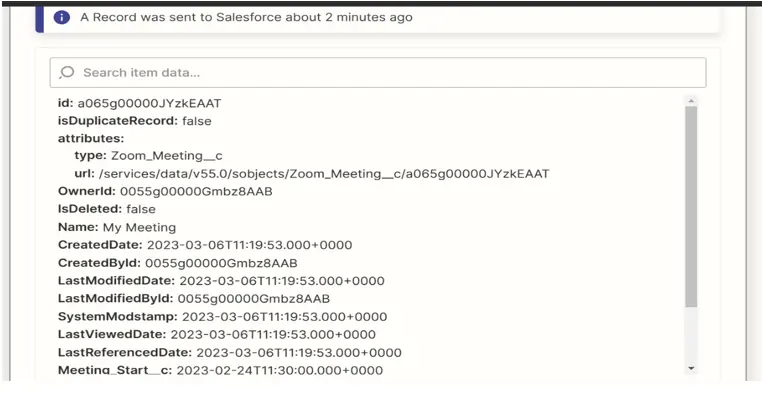
Step 10: Activate your Zap
Activate your zap by clicking on Turn On zap button and now you can test your zap. Now it will create a record in your custom object in your Salesforce org whenever a new meeting will be scheduled in your Zoom account.
Google Sheet with Salesforce
Google Sheet with Salesforce
The steps to Google Sheet with Salesforce are as follows:
Step 1: Create an Account on Zapier
First, you need to create an Account on Zapier if you don’t have one.
Go to https://zapier.com and log in to your account or create a new one.
Step 2: Make a Zap
Click on Choose App & Event and choose the app you want to connect with the event you want to perform
Next, create zap page will appear. On the left corner you can edit your zap name. Select the Google Sheet application and in the Event select “New Spreadsheet Row”.
Step 3: Choose the Account.
Select your Google Drive account in Account section and select Spreadsheet from google drive account. Then hit Continue and Click on Test trigger. It will test dummy data from google sheet in Zapier.
Step 4: Select target application
Click on Choose App & Event and choose which app you want the action to be performed with the Action event you want to perform. So, choose Salesforce in App and choose Create Record in action event.
Step 5: Select the Salesforce Account
Choose the Account. Click the Sign-in button to link your salesforce account in the app to Zapier for the first time. If you have previously connected the app to
Zapier, you can select from the dropdown menu of apps.
Step 6: Select the Salesforce Object and then Map the fields
Choose Lead for Salesforce object and then Map fields of your need (Required * fields are mandatory).
Step 7: Activate your Zap
Click on Test Action to test if your action is working or not and Click on Publish Zap to create the Zap.
Activate your zap by clicking on Turn On zap and now you can test your zap. Add a new detail in row of your google spreadsheet and it will create as a new Lead in Salesforce.
Salesforce and LinkedIn Integration
Salesforce and LinkedIn Integration
Step 1: Create Zapier Account
First, you need to create an Account on Zapier if you don’t have one.
Go to https://zapier.com and log in to your account or create a new one.
Step 2: Create LinkedIn Page
Create page in LinkedIn account.
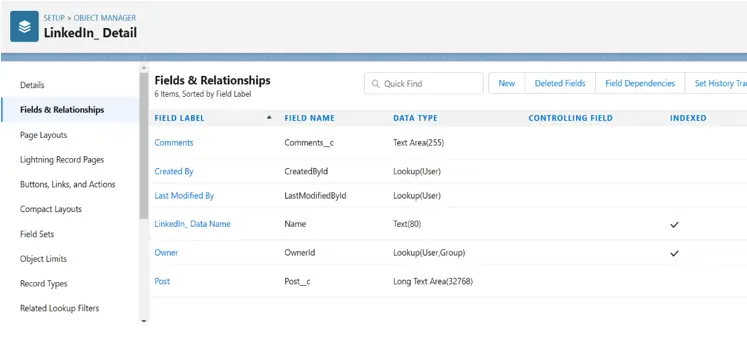
Step 3: Create custom object and custom fields in Salesforce
In your Salesforce org create custom object and some custom fields to store the LinkedIn information as shown below:
Step 4: Make a Zap
Click on Choose App & Event and choose the app you want to connect with the event you want to perform
Next, create zap page will appear. On the left corner you can edit your zap name. Select the LinkedIn application and in the Event select “New Spreadsheet Row”.
Step 5: Choose the Account.
Select your Salesforce account in Account Section and in action event select Create new record. Click the Sign-in button to link your salesforce account in the app to Zapier for the first time. If you have previously connected the app to
Zapier, you can select from the dropdown menu of apps.
Select your Google Drive account in Account section and select Spreadsheet from google drive account. Then hit Continue and Click on Test trigger. It will test dummy data from google sheet in Zapier.
Step 6: Select target application
Click on Choose App & Event and choose which app you want the action to be performed with the Action event you want to perform. So, choose LinkedIn in App and choose Create Share Update in action event.
Step 7: Select the Salesforce Object and then Map the fields
Choose your custom object in Salesforce object and then Map fields of your need (Required * fields are mandatory).
Step 8: Activate your Zap
Click on Test Action to test if your action is working or not and Click on Publish Zap to create the Zap. Then, activate your zap by clicking on Turn On zap and now you can test your zap. Now, create a new record in your custom object in your Salesforce org and write the post and comments in the fields then it will share the post in your LinkedIn page.












Leave A Comment